
Blank Length for Rolling a Cylinder (Shell Course): Step by Step
Mean diameter, neutral axis, a worked example and a blank length table for rolling a cylinder from 12 mm plate.
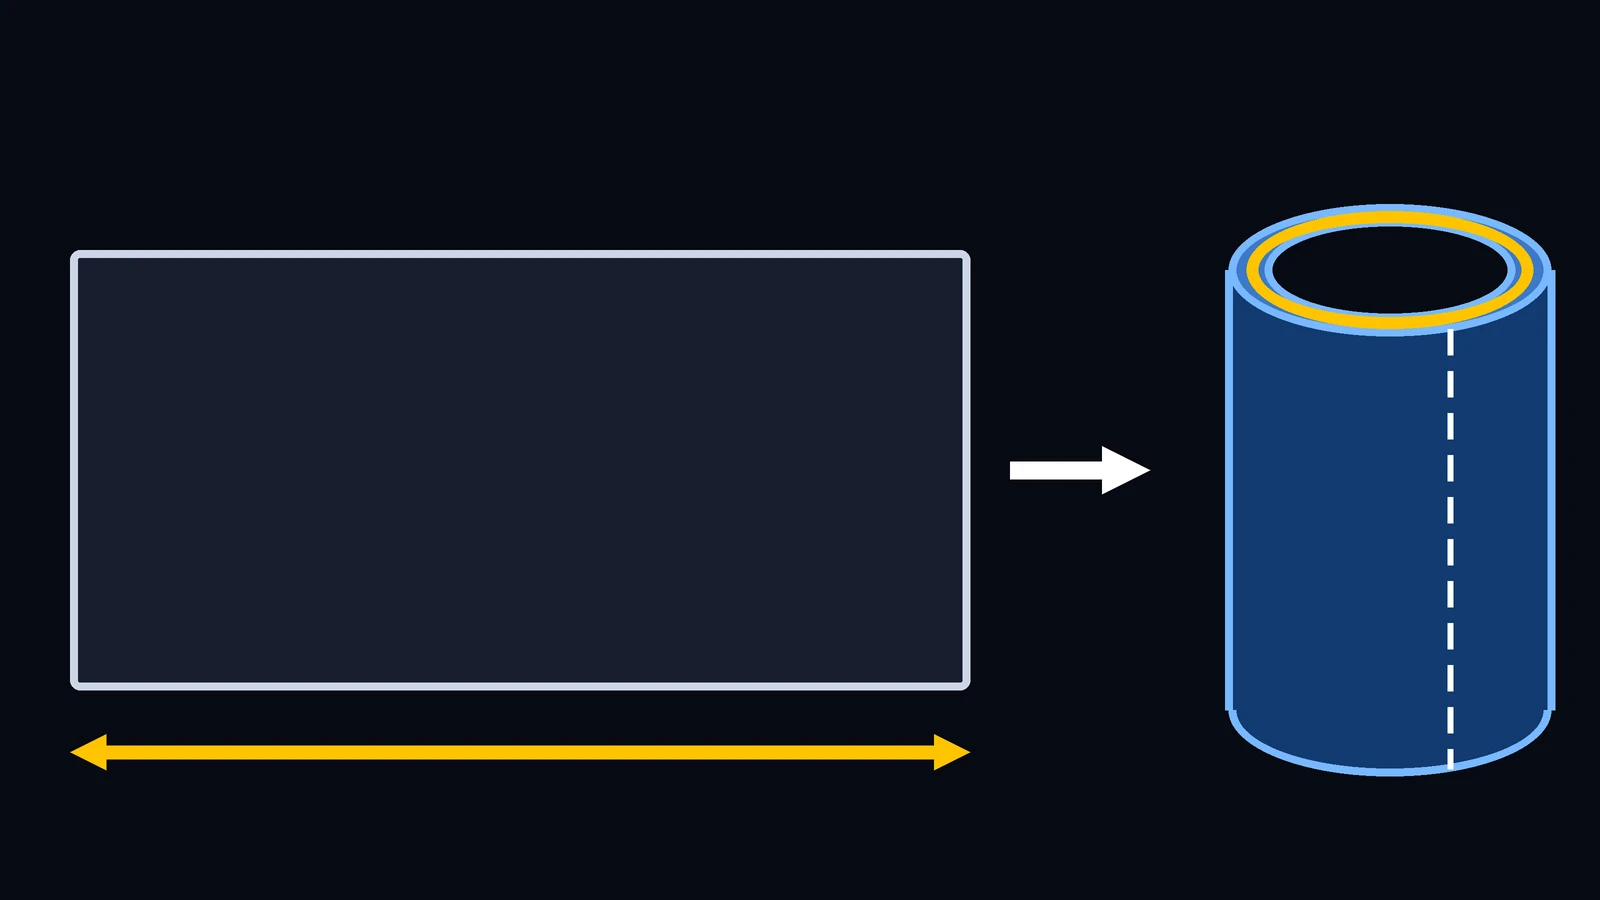
The blank length for rolling a cylinder (the length of the flat plate before it is rolled, also called the flat length, cut length or developed length) is determined before the plate reaches the plate roll: the plate has to be cut to the right length. If it is too short, the cylinder will not close. If it is too long, material is left over and the diameter ends up larger than the drawing calls for. The calculation is simple, but it depends on a choice many people get wrong: which diameter to use.
In this article we will work with one specific situation:
a shell course, that is, a cylindrical ring with a circular cross-section, rolled from a single rectangular plate;
plate of constant thickness, rolled in one piece, with one longitudinal seam;
a diameter given by the drawing, outside or inside;
calculating the blank length and checking that the cut is square.
Cones, transitions and parts whose diameter changes need a different calculation; for the cone, see the article on the truncated cone.
What happens to the plate in the plate roll
When the plate is rolled, the outer face stretches and the inner face is compressed. Between them there is a line that neither stretches nor compresses, the neutral axis. The blank length is measured on it, and the diameter of that line, approximated at mid-thickness, is the mean diameter (Dm). With OD the outside diameter, ID the inside diameter and t the plate thickness:
Dm = OD − t = ID + t
L = π × Dm
Every circle drawn through the cross-section has a circumference equal to π times its diameter. That is why using the outside diameter gives a plate that is too long, and using the inside diameter gives one that is too short. The mid-thickness line sits halfway between the two.
This mid-thickness calculation works well when the plate is thin compared with the diameter. When the plate is thick compared with the diameter, the neutral axis can sit slightly toward the inside, and the actual length may differ from the calculated one. In that case, make a test piece before cutting the final plate.
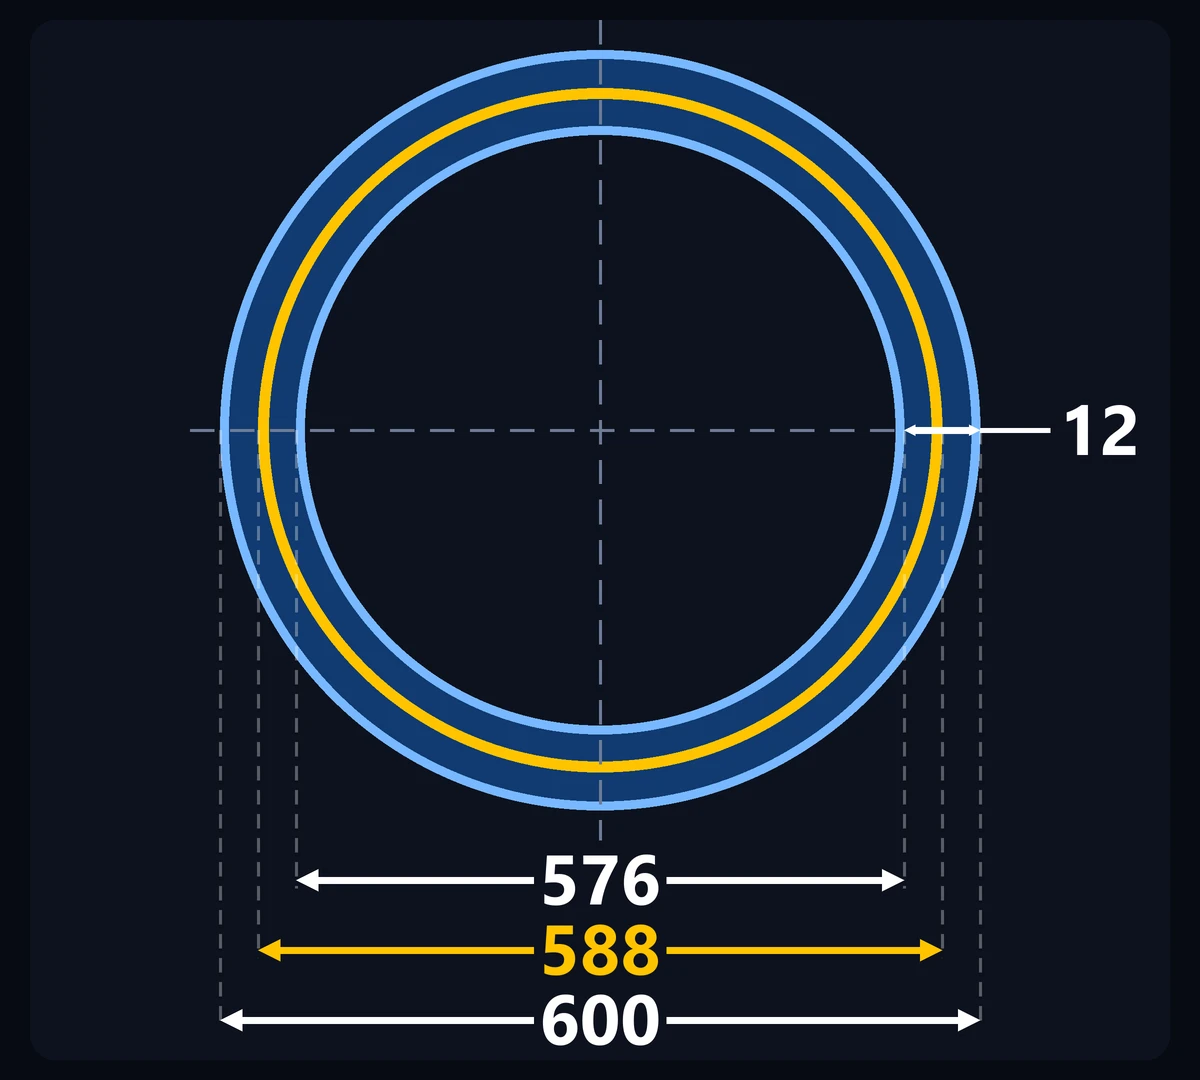
Figure 1: Top view of the shell course in the example, with thickness t = 12 mm (enlarged 5 times in the drawing so it can be seen). The yellow line is the neutral axis (the mid-thickness line), which gives the blank length: a mean diameter of 588 mm, between the outside 600 mm and the inside 576 mm.
Measurements you need
OD or ID: the diameter the drawing gives;
t: the plate thickness. Measure it with calipers or a micrometer, because the actual thickness may differ from the nominal one;
H: the height of the shell course, which is the width of the plate along the axis of the cylinder;
g: the root gap of the seam, also called root opening (the space between the two edges once closed, measured at the neutral axis), only if the welding procedure calls for one.
How to calculate and cut the plate, step by step
Step 1 — Identify the diameter and measure the thickness
Check whether the drawing gives the outside or the inside diameter, and measure the actual thickness of the plate that will be used. Write both down, in the same unit.
Step 2 — Calculate the mean diameter
If the drawing gives the outside diameter, subtract one thickness: Dm = OD − t. If it gives the inside diameter, add one thickness: Dm = ID + t. Both routes lead to the same value.
Step 3 — Calculate the blank length for rolling a cylinder
Multiply the mean diameter by π: L = π × Dm. If the welding procedure calls for a root gap g, it is part of the circumference once the shell is closed (plate + gap = π × Dm), so subtract it: L = π × Dm − g.
Step 4 — Establish the height and mark the rectangle
The height H of the plate is the height of the shell course. Mark on the plate a rectangle of length L, in the direction the plate will travel through the plate roll, and height H.
Step 5 — Check the squareness with the diagonals
In a rectangle, the two diagonals have the same length, which is √(L² + H²). Measure both. If they differ, the layout is not square and the two edges of the seam will not meet in line after rolling.
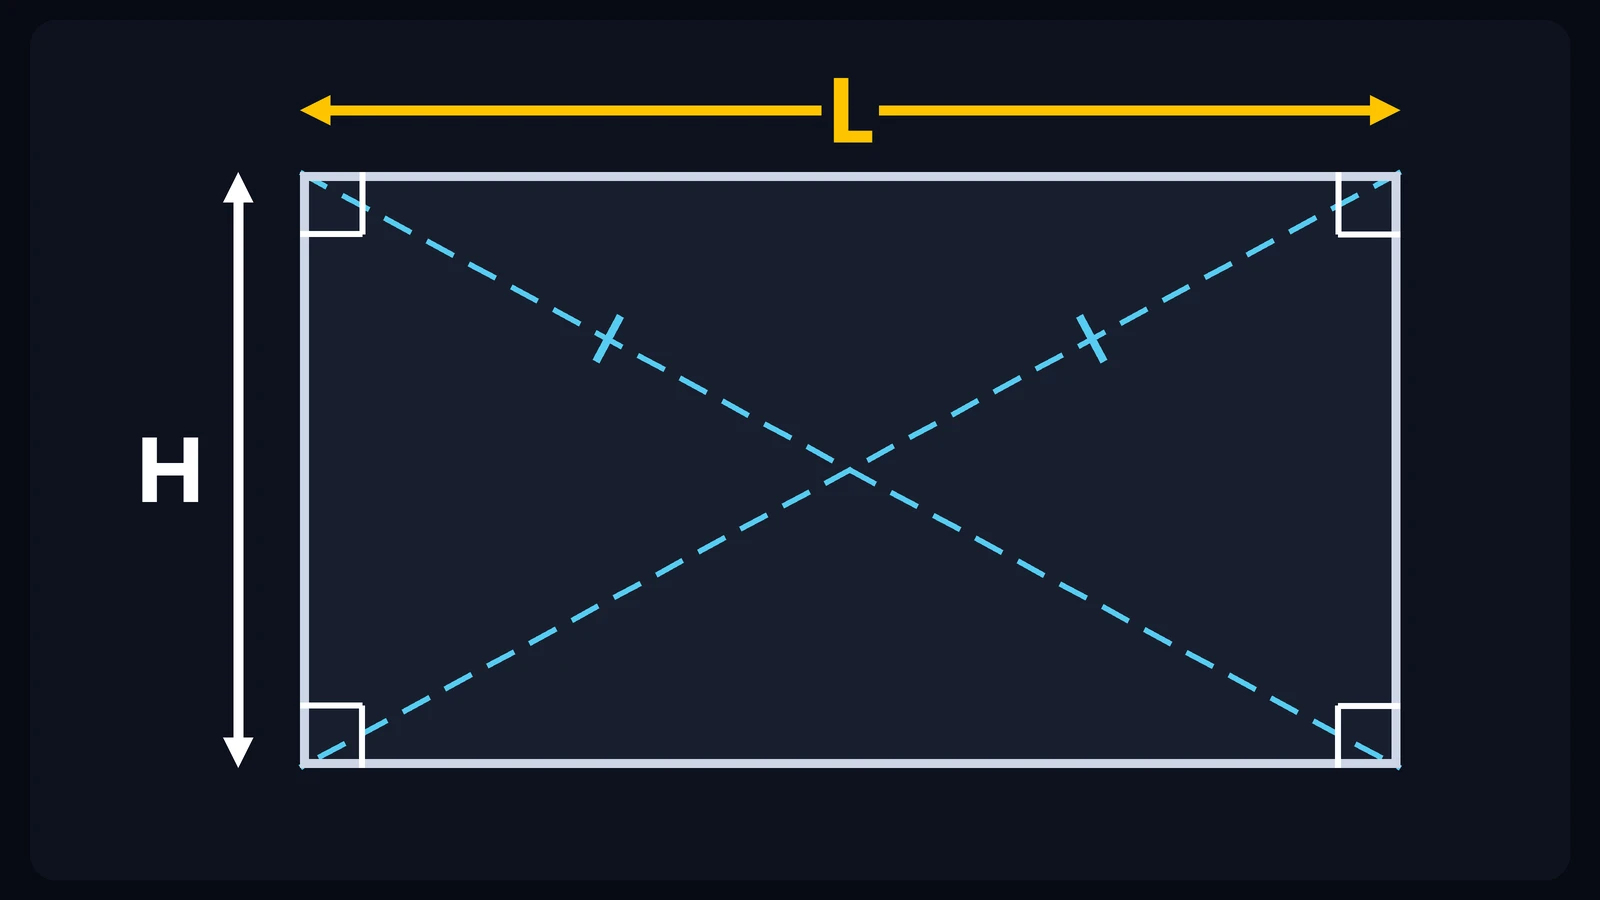
Figure 2: The cut plate, in the proportion of the example. The length L (in yellow) is the one you calculate, and the height H is the height of the shell course. The corners are square and the two diagonals, which carry the same mark, must have the same length.
Step 6 — Cut and prepare the edges
Cut the plate along the lines and prepare the edges of the seam (the bevel) as the welding procedure requires. Check the length and height of the cut plate again.
Step 7 — Pre-bend the ends and roll
In a three-roll plate roll (a plate rolling machine), the ends of the plate lie outside the region between the rolls and come out straight. That is why the ends must be pre-bent, according to the procedure for your machine; without it, a flat spot is left at the seam. Then roll in several passes, closing the gap between the rolls gradually, and, with the machine stopped, check the curvature against a template, which is a piece of plate cut to the radius of the shell course. The plate tends to open up a little after rolling (springback), which is why the plate is rolled slightly past the final radius.
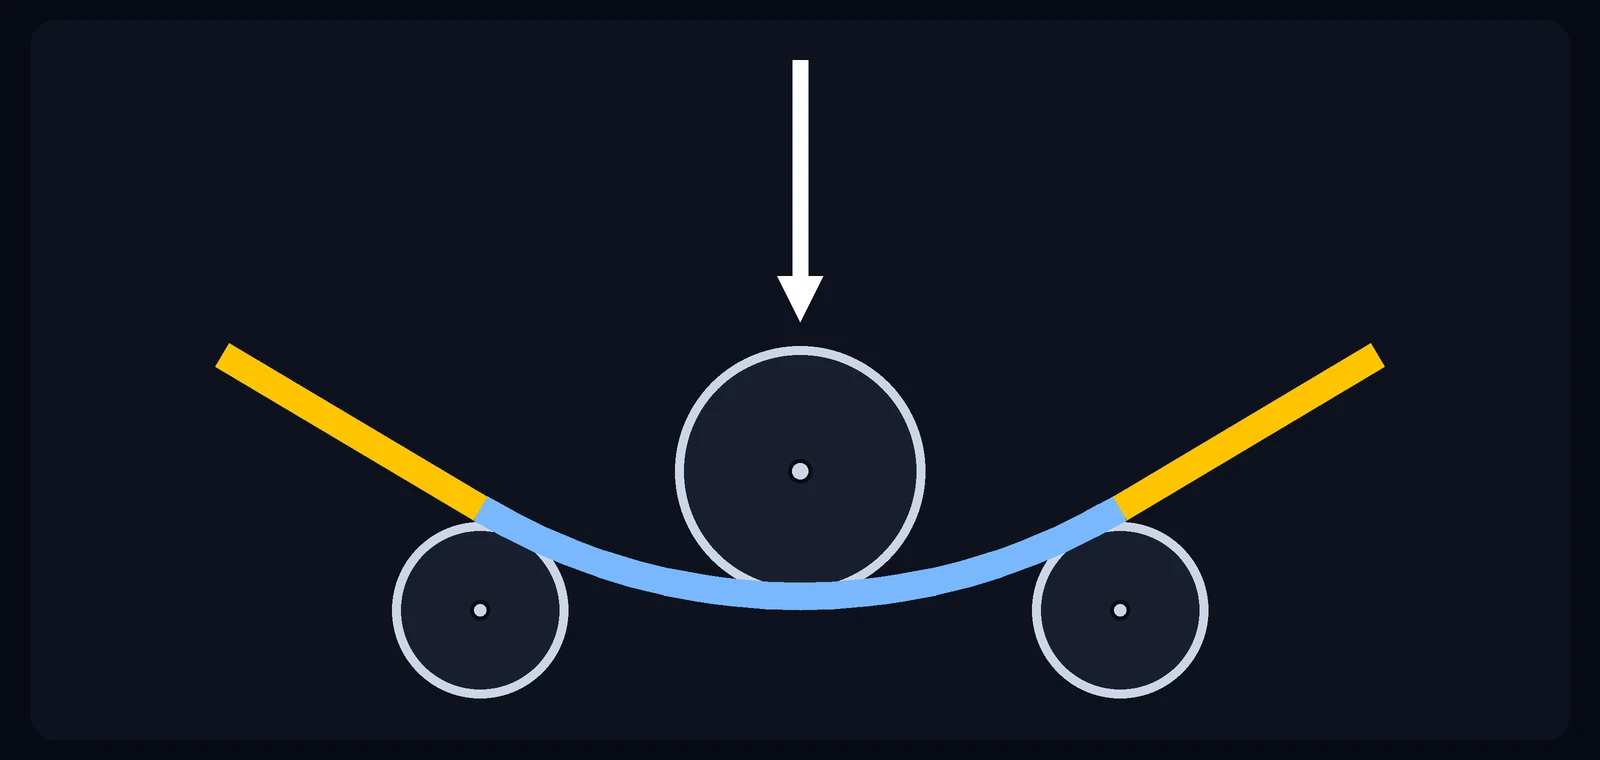
Figure 3: Diagram of a three-roll plate rolling machine, not to scale. In this diagram, the top roll comes down and bends the plate between the two lower ones. The ends, in yellow, stay straight and must be pre-bent.
Step 8 — Close, check and weld
Close the shell course, line up the edges and measure the outside circumference with a tape measure: the expected value is π × OD (the tape runs across the root gap, if there is one, which is part of the circumference). Only after checking the diameter and the alignment of the edges should you weld the seam.
Carry TraceClub in your pocket
Boilermaking layouts, calculations and technical manuals in the palm of your hand — fast, accurate and always with you in the shop or in the field.
- Available for iOS and Android
- Works offline
- PT · EN · ES

Worked example: a shell course with a 600 mm outside diameter
A shell course with an outside diameter of 600 mm, plate 12 mm thick and a height of 1,000 mm, with no root gap, using π = 3.1416:
mean diameter: 600 − 12 = 588 mm. From the inside: 600 − 2 × 12 = 576 mm, and 576 + 12 = 588 mm;
blank length: L = 3.1416 × 588 = 1,847.26 mm;
plate height: H = 1,000 mm;
diagonals: √(1,847.26² + 1,000²) = 2,100.56 mm each;
check after closing: π × 600 = 1,884.96 mm of outside circumference, which is 1,847.26 + 37.70 = 1,884.96 mm, that is, the plate plus π × 12 mm;
diameter check: 1,847.26 ÷ 3.1416 + 12 = 588 + 12 = 600 mm.
What happens if you use the wrong diameter
In the same example, which diameter you use changes the blank length by π × 12 = 37.70 mm, up or down, which equals a shell course 12 mm larger or smaller in diameter, exactly the thickness:
Diameter used | Value (mm) | Blank length (mm) | Difference from the correct length (mm) |
|---|---|---|---|
Outside | 600 | 1,884.96 | +37.70 |
Mean (correct) | 588 | 1,847.26 | 0 |
Inside | 576 | 1,809.56 | −37.70 |
Blank length table for 12 mm plate
Values of L = 3.1416 × (OD − 12), with no root gap:
Outside diameter (mm) | Mean diameter (mm) | Blank length L (mm) |
|---|---|---|
300 | 288 | 904.78 |
400 | 388 | 1,218.94 |
500 | 488 | 1,533.10 |
600 | 588 | 1,847.26 |
800 | 788 | 2,475.58 |
1,000 | 988 | 3,103.90 |
If your calculation gives different values from these for the same thickness, check it before cutting.
Common mistakes when calculating the blank length for rolling a cylinder
1. Using the outside (or inside) diameter instead of the mean
This is a common mistake. In the example, the plate would come out 37.70 mm too long or too short, and the final diameter 12 mm larger or smaller than the drawing.
2. Using the nominal thickness without measuring
The actual thickness of the plate may differ from the nominal one, and the difference goes into the mean diameter. Measure the plate that will be rolled.
3. Forgetting the root gap
If the welding procedure calls for a gap at the seam, it is part of the circumference and must be subtracted from the length: L = π × Dm − g. Adding it would make the shell course larger than the drawing calls for.
4. Not pre-bending the ends
Without pre-bending, the ends stay straight and the shell course does not close into a circle at the seam.
5. Cutting without checking the squareness
A rectangle with unequal diagonals gives edges that are out of line at the seam. Measure both diagonals before cutting.
6. Mixing up the length and the height
The length L is the one in the direction the plate travels through the rolls, which gives the circumference. The height H is the width of the plate along the axis and stays the same on the shell course.
Frequently asked questions
How do you calculate the length of plate needed to roll a cylinder?
Use the mean diameter: L = π × Dm, with Dm = outside diameter − thickness. In the example (a 600 mm shell course and 12 mm plate), Dm = 588 mm and L = 1,847.26 mm.
Can I start from the inside diameter?
Yes. Add the thickness to the inside diameter to get the mean diameter and use the same formula. The result is the same.
What if the plate is very thick?
The mean-diameter calculation is the starting point. When the plate is thick compared with the diameter, the neutral axis can move away from mid-thickness and the actual length may be slightly different. Cut a test piece of the same material and thickness, roll it and measure it before the final part.
Can I use 3.14 instead of 3.1416?
You can, but the error grows with the diameter. In the example, 3.14 × 588 = 1,846.32 mm, against 1,847.26 mm with 3.1416: 0.94 mm shorter.
How do I calculate a shell course made from two or more plates?
Divide the total length, π × Dm, by the number of equal plates and subtract the gap of each seam, if there is one: each plate is π × Dm ÷ n − g.
What if the shell is conical?
The length changes along the part and the flat pattern is no longer a rectangle. See the article on the truncated cone.
See also
Step-by-step summary
To calculate the plate for a shell course:
check whether the drawing gives the outside or the inside diameter and measure the actual thickness;
calculate the mean diameter: outside − t, or inside + t;
calculate the length L = π × Dm (minus the root gap, if there is one);
set the height H and mark the rectangle L × H;
check the squareness: the two diagonals must be equal;
cut and prepare the edges of the seam;
pre-bend the ends and roll in several passes, checking the curvature;
close, check the outside circumference (π × OD) and only then weld.
Important
This article covers a cylindrical shell course made from a single plate of constant thickness. For a plate that is thick compared with the diameter, or for any other shape of part, confirm the length with a test piece. The plate roll has pinch points between the rolls: keep hands, clothing and tools away from the moving rolls, wear the appropriate personal protective equipment, check the part only with the machine stopped and follow the operating and lifting procedures of your workplace.
Carry TraceClub in your pocket
Boilermaking layouts, calculations and technical manuals in the palm of your hand — fast, accurate and always with you in the shop or in the field.
- Available for iOS and Android
- Works offline
- PT · EN · ES