
Sphere Pattern Development: Gore Method, Step by Step
Sphere pattern development with gores: width of each gore, axis of π × R, step-by-step method and a measurement table.
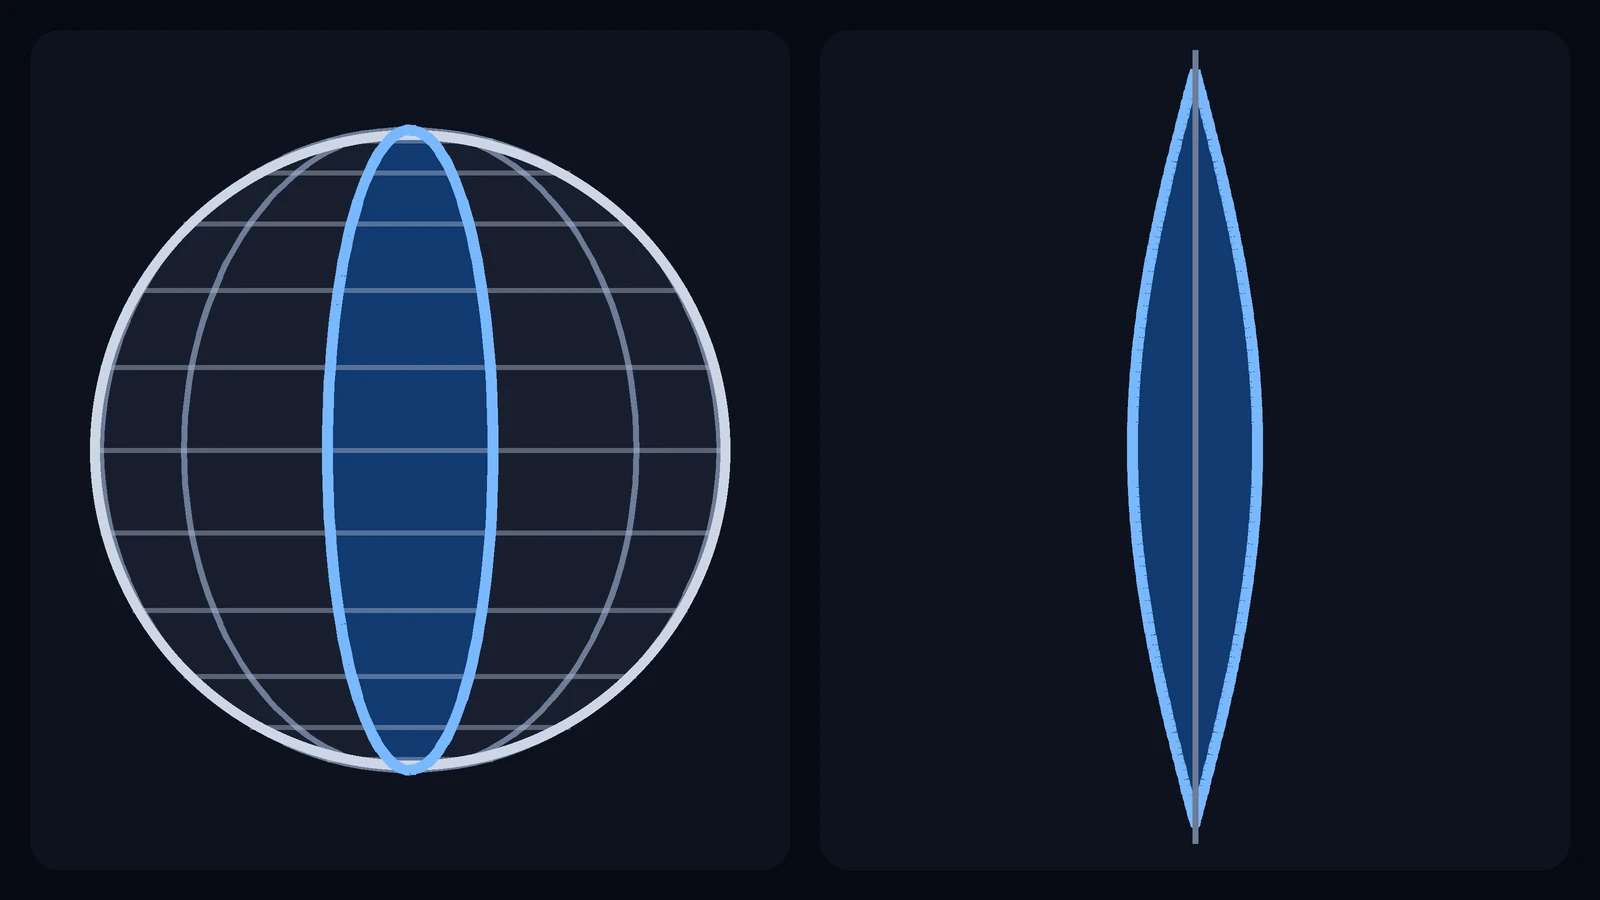
Sphere pattern development by the gore method is the layout of the pieces of sheet that, formed and welded, make up a sphere. A sphere is not developable: unlike a cylinder or a cone, it cannot be laid flat without distorting the sheet, so every flat pattern of it is approximate. The shop solution is to divide the sphere into equal gores, each one drawn as a strip that narrows toward the poles.
In this article we work with one specific piece:
a complete sphere of diameter D, divided by meridian planes into n equal gores (the angle of each gore at the poles is 360° ÷ n);
thin sheet, which will be formed (pressed or hammered) gore by gore and welded along the edges;
known measurement: the diameter D, outside or mean.
Heads, caps and spheres developed in zones (horizontal bands approximated by truncated cones) need another layout: see how to lay out a truncated cone and, for the segments of an elbow, the segmented elbow.
Why a sphere is not developable
Picture the n meridian planes, which pass through the poles and divide the sphere into n gores. The flat drawing of each gore starts from the axis, the central meridian, which runs from pole to pole and measures L = π × R. At each point of the axis, the width of the gore is the arc of the parallel between the two neighboring meridians, that is, the circumference of the parallel divided by n:
w = π × D × sin θ ÷ n
Here, θ is the angular distance of the point from the pole (0° at the pole, 90° at the equator, 180° at the other pole). At the equator, sin θ = 1, and the width is at its maximum, π × D ÷ n.
The drawing has two virtues: the axis and every parallel come out at their true length, and the area of the flat gore equals that of the spherical gore, 4 × π × R² ÷ n. And one flaw, the price of flattening a sphere: the curved edge of the flat gore is a little longer than the meridian of the sphere. In the example, the edge measures 638.95 mm against 628.32 mm for the meridian: 638.95 − 628.32 = 10.63 mm, or 1.69 % more. That difference is taken up when the sheet is formed; this is why the result is an approximate development.
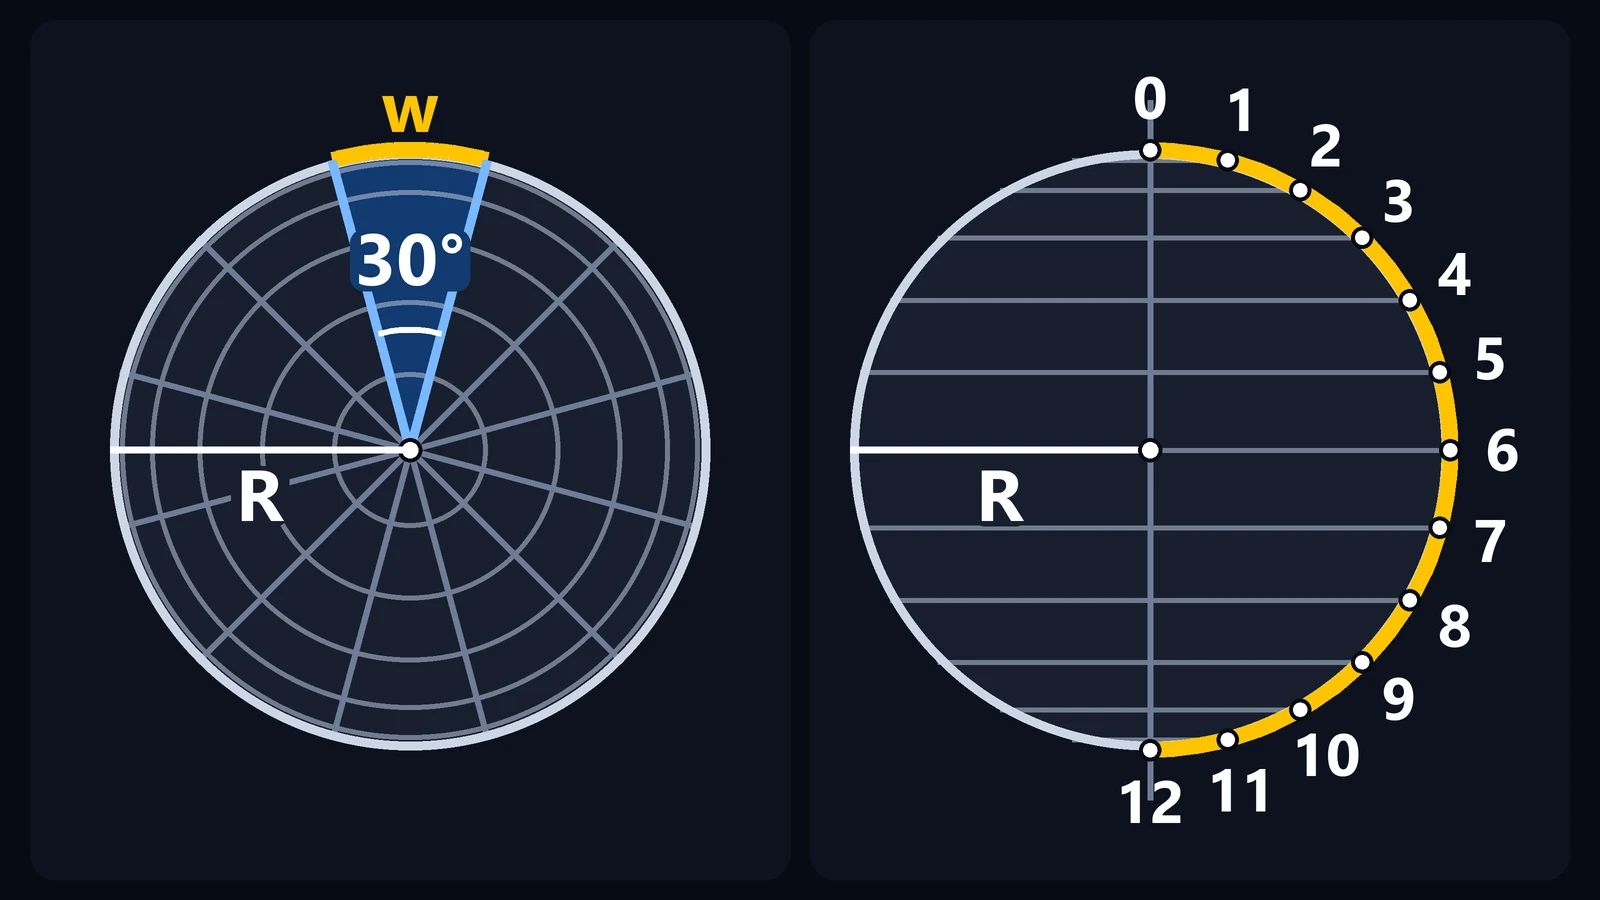
Figure 1: The two views of the sphere, on the same scale. Left: the top view, with 12 meridians every 30° and the parallels as concentric circles; one gore is highlighted and the yellow arc at the equator is the width w. Right: the front view: the outline is the meridian, divided into 12 arcs of 15° (points 0 to 12, in yellow), and the parallels are the horizontal lines.
Measurements you need
Measurement | Meaning |
|---|---|
D and R | Diameter of the sphere and its radius, R = D ÷ 2 (in sheet, use the mean diameter) |
n | Number of gores (here, 12, with 30° each at the poles) |
θ | Angular distance of a point from the pole; the axis is divided every 15° |
L | Length of the axis, from pole to pole: L = π × R |
w | Width of the flat gore at each division: w = π × D × sin θ ÷ n |
In the example, the sphere has D = 400 mm (R = 200 mm) and 12 gores. We use π = 3.1416.
Step-by-step sphere pattern development with gores
Step 1 — Draw the two views
Draw the front view, a circle of radius R, and, lined up with it, the top view, another circle of radius R divided into 12 sectors of 30° by 12 meridians. In the front view, the outline is the meridian, and the parallels show up as horizontal lines.
Step 2 — Divide the meridian
Divide the half outline of the front view, from pole to pole, into 12 arcs of 15° and number the points 0 to 12: 0 is the pole, 6 is the equator and 12 is the other pole.
Step 3 — Calculate the axis
L = π × R = 3.1416 × 200 = 628.32 mm. Divided into 12 parts, each division measures 628.32 ÷ 12 = 52.36 mm.
Carry TraceClub in your pocket
Boilermaking layouts, calculations and technical manuals in the palm of your hand — fast, accurate and always with you in the shop or in the field.
- Available for iOS and Android
- Works offline
- PT · EN · ES

Step 4 — Calculate the width at each division
The circumference at the equator is π × D = 3.1416 × 400 = 1,256.64 mm, and the maximum width of the gore is 1,256.64 ÷ 12 = 104.72 mm. At the other divisions, multiply that width by sin θ; the values are in the table below. The width is zero at the poles.
Step 5 — Lay out the gore
On paper or cardboard, draw a straight line 628.32 mm long and mark the 12 divisions, numbered 0 to 12. At each division, draw a perpendicular and mark the width w, half on each side of the line. Join the points with a smooth, continuous curve: the outline is a strip that ends in a point at both poles.
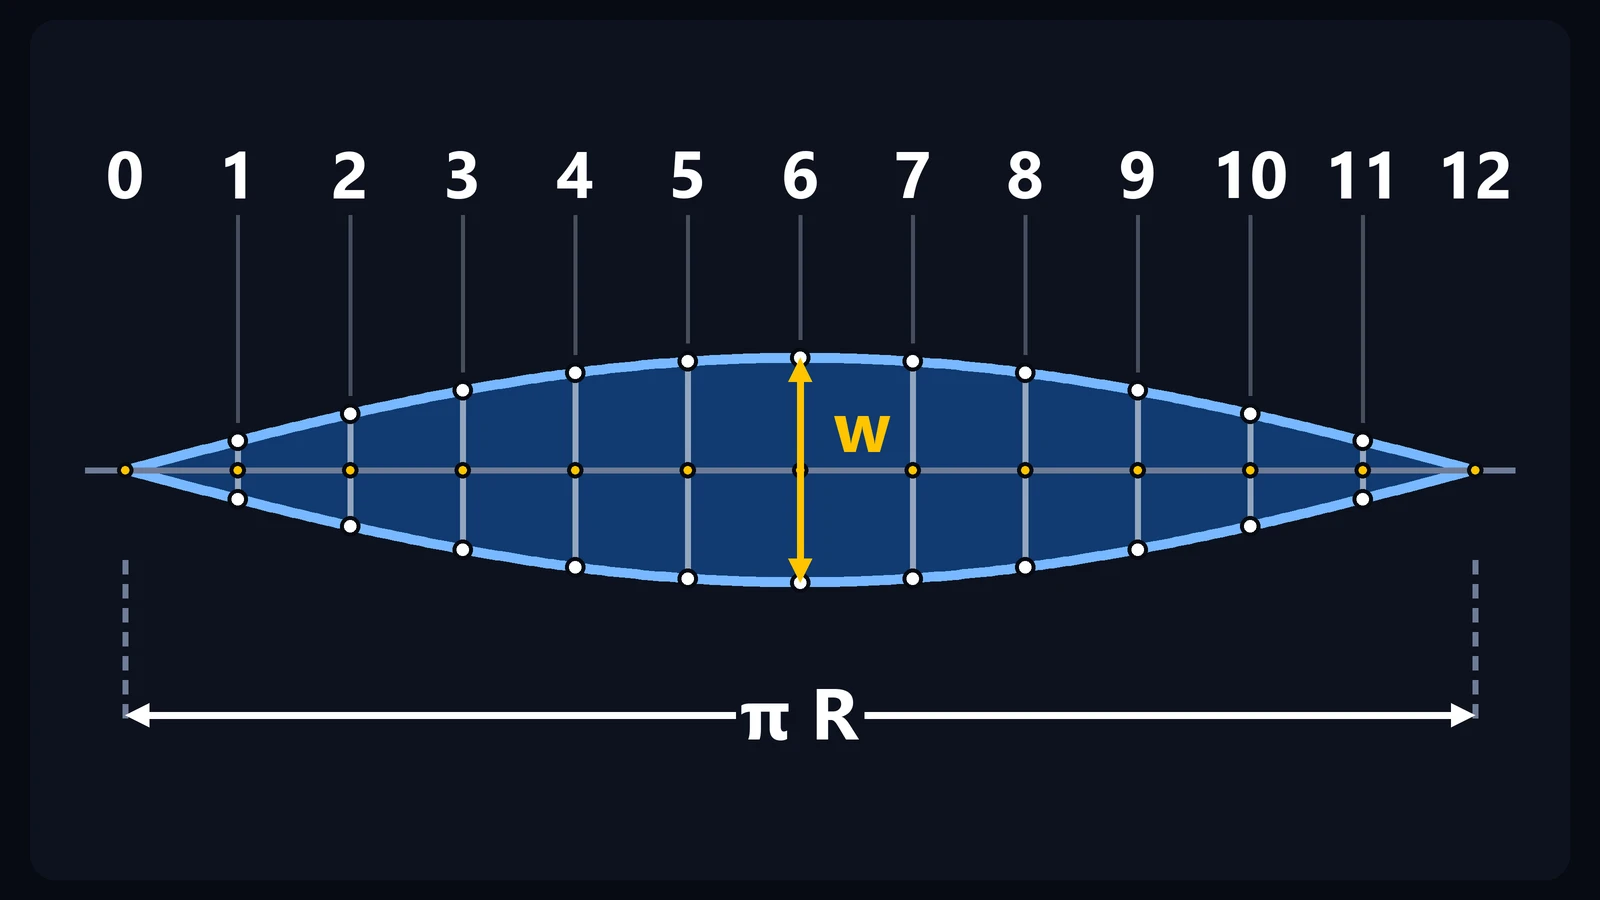
Figure 2: The flat gore, drawn to the same scale in both directions. The dashed axis measures π × R and has 12 equal divisions (points 0 to 12); the width at each point, marked on both sides of the axis, is w = π × D × sin θ ÷ n, zero at the poles (0 and 12) and maximum at the equator (point 6). The blue outline runs through the 13 points.
Step 6 — Cut out the template and mark the 12 gores
Cut out the template and use it to mark the 12 gores on the sheet, numbered 1 to 12. Add the root gap or bevel the procedure calls for. If the sheet is formed before cutting, mark the outline after forming.
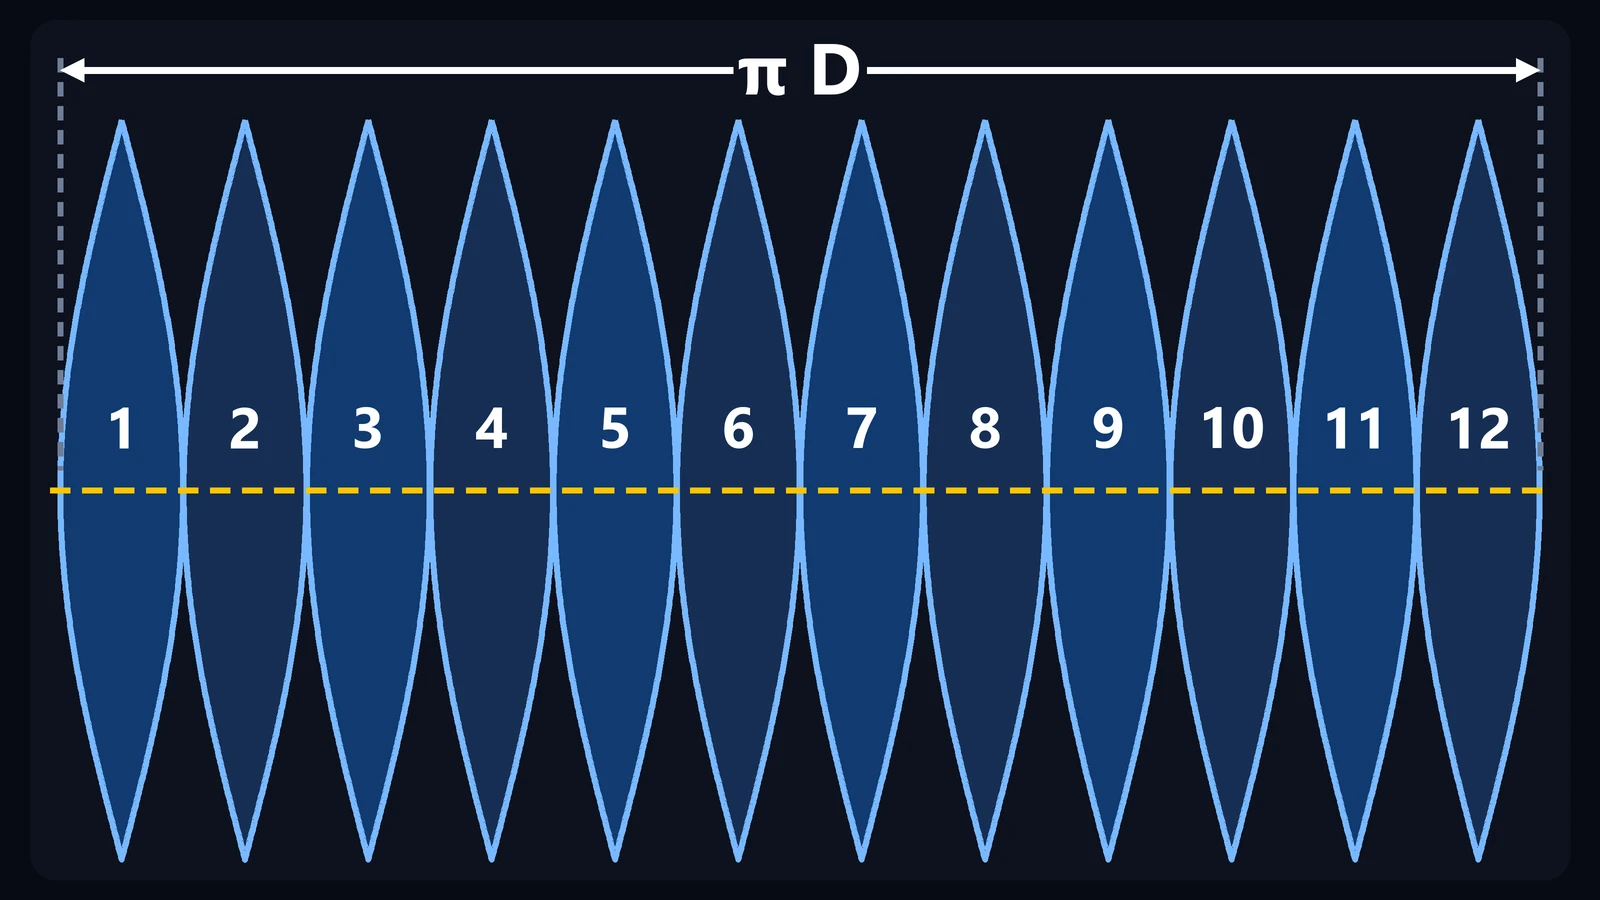
Figure 3: The 12 gores side by side, drawn to scale, joined at the equator (dashed yellow line) and numbered 1 to 12. The total width at the equator is the circumference, π × D; the poles of the gores stay apart. This is how the 12 gores lie on the sheet, and the shape the closed sphere has to rebuild.
Step 7 — Form and check
Form each gore until it takes the curvature of the sphere and check it with a curved template cut to radius R. Because the edge of the flat gore is longer than the meridian, the sheet has to be formed, not just bent: that is what makes the sphere close.
Step 8 — Assemble and weld
Join the gores along the edges, starting at the equator, and check the diameter in two directions before welding. Closing at the poles takes care: the 12 tips meet at a single point.
Measurement table: 400 mm sphere with 12 gores
Values for D = 400 mm, 12 gores and the axis divided every 15°. The distance is measured from the pole, along the axis, and the width is that of the flat gore at that division.
Point | θ (°) | Distance from pole (mm) | Width w (mm) |
|---|---|---|---|
0 | 0 | 0.00 | 0.00 |
1 | 15 | 52.36 | 27.10 |
2 | 30 | 104.72 | 52.36 |
3 | 45 | 157.08 | 74.05 |
4 | 60 | 209.44 | 90.69 |
5 | 75 | 261.80 | 101.15 |
6 | 90 | 314.16 | 104.72 |
The gore is symmetrical about the equator: points 7 to 12 repeat points 5 to 0, in the same order.
How many gores to use
The more gores, the narrower each one and the smaller the difference between the edge of the flat gore and the meridian of the sphere. With D = 400 mm:
Gores (n) | Width at the equator (mm) | Edge longer than the meridian |
|---|---|---|
6 | 209.44 | 6.54 % |
8 | 157.08 | 3.75 % |
12 | 104.72 | 1.69 % |
16 | 78.54 | 0.96 % |
24 | 52.36 | 0.43 % |
For large spheres or thicker sheet, use more gores: forming gets easier and the sphere comes out rounder.
What if the piece is made of sheet?
In sheet, use the mean diameter, that is, the outside diameter minus the thickness. With a sphere of 400 mm outside and 3 mm sheet: 400 − 3 = 397 mm, or R = 198.5 mm. Then C = 3.1416 × 397 = 1,247.22 mm, the axis measures 623.61 mm (a division of 51.97 mm) and the maximum width of the gore is 103.93 mm.
Common mistakes in sphere pattern development
1. Using the chord instead of the arc
Some graphic constructions measure the chord of the parallel in the top view, not the arc. At the equator, the chord is 2 × R × sin 15° = 103.53 mm, and the arc, 104.72 mm: 104.72 − 103.53 = 1.19 mm less. With 12 gores the difference is small, but the arc is the true length.
2. Dividing the axis by height
The divisions of the axis are equal arcs of the meridian (15° each), not equal heights in the front view. Dividing by height puts the points at the wrong angles (point 1 would fall at 33.6° instead of 15°) and the width at each division comes out wrong.
3. Using the outside diameter in sheet
The development holds for the mean surface of the sheet. With the outside diameter, each gore comes out a little wide and long.
4. Using too few gores
With few gores, the edge of the flat gore goes well past the meridian and the sheet has to deform more: forming gets hard and the sphere tends to come out faceted.
Frequently asked questions
What is sphere pattern development by the gore method?
It is the method of dividing the sphere by meridians into equal gores and drawing each one as a flat strip whose width at each point of the axis is the circumference of the parallel divided by the number of gores. The result is approximate, because a sphere is not developable.
Why is there no exact flat pattern of a sphere?
Because a sphere cannot be laid on a plane without stretching or tearing the surface, unlike a cylinder, a cone or a prism. Any flat drawing keeps some lengths and distorts others.
How do you calculate the width of a sphere gore?
With w = π × D × sin θ ÷ n, where θ is the angular distance of the point from the pole. At the equator, w = π × D ÷ n; in the example, 104.72 mm.
How much sheet does the sphere use?
The area of the sphere, 4 × π × R² = 12.5664 × 40,000 = 502,656 mm², plus cutting losses and the root gap. Each flat gore has 502,656 ÷ 12 = 41,888 mm².
How do you avoid the gore tips at the poles?
On large spheres, the poles are usually closed with spherical caps instead of the tips of all the gores; the gores then end wider, at a chosen latitude. That arrangement has another layout and is not covered here.
Is there another method to develop a sphere?
Yes: the zone method divides the sphere into horizontal bands, each approximated by a truncated cone. Gores follow the shape of the sphere better when there are many of them, and zones use the truncated-cone layout.
See also
Step-by-step summary
To carry out the sphere pattern development by gores:
draw the front and top views and divide the sphere into 12 gores of 30°;
divide the meridian into 12 arcs of 15°, points 0 to 12;
calculate the axis L = π × R and the division L ÷ 12;
calculate the width at each division, w = π × D × sin θ ÷ n;
lay out the gore on the axis, with the width at each division, and join the points with a smooth curve;
cut out the template and mark the 12 gores on the sheet;
form the gores, check the curvature and assemble along the edges.
Important
This article specifically covers the case of a complete sphere divided into equal gores by meridian planes, developed approximately and formed afterward. Changing any of these conditions changes the pattern. When cutting and forming the sheet, wear suitable personal protective equipment and clamp the piece securely.
Carry TraceClub in your pocket
Boilermaking layouts, calculations and technical manuals in the palm of your hand — fast, accurate and always with you in the shop or in the field.
- Available for iOS and Android
- Works offline
- PT · EN · ES